 似水流年
似水流年wordpress的后台登陆页面很简洁,但不好看,下面我就用简单的方法美化一下wordpress后台登陆页。
1.首先在主题文件夹内的functions.php文件中增加代码,增加在末尾的?>前面,有些php文件里没有末尾的?>这个标记的,就直接增加在末尾。代码如下:
//后台登录页面
function custom_login() {
echo '<link rel="stylesheet" type="text/css" href="' . get_bloginfo('template_directory') . '/css/login.css" />'."\n";
echo '<script type="text/javascript" src="https://libs.baidu.com/jquery/2.1.4/jquery.min.js"></script>'."\n";
}
add_action('login_head', 'custom_login');
//后台登录页面标题
function custom_headertitle ( $title ) {
return get_bloginfo('name');
}
add_filter('login_headertitle','custom_headertitle');
//后台登录页面链接
function custom_loginlogo_url($url) {
return esc_url( home_url('/') );
}
add_filter( 'login_headerurl', 'custom_loginlogo_url' );
//后台登录页面底部
function custom_html() {
echo '<div class="footer">'."\n";
echo '<p>Copyright © 2017 All Rights | Theme by <a href="https://www.wangjunwei.com" target="_blank">似水流年</a></p>'."\n";
echo '</div>'."\n";
echo '<script type="text/javascript" src="'.get_bloginfo('template_directory').'/js/resizeBg.js"></script>'."\n";
echo '<script type="text/javascript">'."\n";
echo 'jQuery("body").prepend("<div class=\"loading\"><img src=\"'.get_bloginfo('template_directory').'/images/login_loading.gif\"></div><div id=\"bg\"><img /></div>");'."\n";
echo 'jQuery(\'#bg\').children(\'img\').attr(\'src\', \''.get_bloginfo('template_directory').'/images/login_bg.jpg\').load(function(){'."\n";
echo ' resizeImage(\'bg\');'."\n";
echo ' jQuery(window).bind("resize", function() { resizeImage(\'bg\'); });'."\n";
echo ' jQuery(\'.loading\').fadeOut();'."\n";
echo '});';
echo '</script>'."\n";
}
add_action('login_footer', 'custom_html');
2.增加CSS和JS文件
2.1在主题目录的CSS文件夹下新建login.css文件,代码如下:
/* clear float*/
.clearfix:after {
    content: ".";
    display: block;
    height: 0;
    clear: both;
    visibility: hidden;
}
.clearfix {
    display: block;
}
/* common*/
html {
    overflow:hidden;
}
body {
    background:none !important;
    overflow:hidden;
}
#bg img {
    opacity:0;
}
/* login*/
#login {
    font:12px;
    padding:50px 100px;
    margin:80px auto 0;
    background-color:rgba(0,0,0,.5);
}
#login h1 a {
    font-weight:bold;
    text-indent:0px;
    background:none !important;
    font-size:36px;
    height:64px;
    width: 280px;
    line-height:64px;
    line-height:180%;
    text-align:center;
    color:#FFF;
    margin-bottom:10px;
}
#login form {
    padding:10px 0px;
    background:rgba(0,0,0,0);
    box-shadow: 0 0 0 rgba(0,0,0,0);
}
#login form p {
    position:relative;
    padding:0px 15px;
}
#login a {
    color:#FFF !important;
}
#login_error a {
    color:#000 !important;
}
#login form label {
    color:#c1c1c1;
}
#login form .input {
    background: rgba(0,0,0,.4);
    padding: 5px;
    border-radius: 3px;
    border: 1px dashed #666;
    color: #ccc !important;
    -webkit-transition: .5s border-color ease-in-out;
}
.login .input {
    background: rgba(0,0,0,.4);
}
#login form .input:focus {
    box-shadow:none;
}
#login .form-send .bot {
    width:100%;
    border-bottom:1px solid #ccc;
}
#login form .forgetmenot {
    float:none;
}
#login form p.submit {
    padding:0px 15px;
}
#login .submit .button {
    width:100%;
    margin:10px auto;
    border:none;
    float:none;
    border-radius:5px;
    height:34px;
    font-size:14px;
    text-align:center;
    color:#FFF;
    background:#529ECC;
    font-weight:bold;
    cursor:pointer;
    -webkit-transition: all .5s linear;
    -moz-transition: all .5s linear;
    -o-transition: all .5s linear;
    transition: all .5s linear;
}
#login .submit .button:hover {
    background:#356fb7;
}
/* footer*/
.footer {
    font-size:12px;
    position:absolute;
    left:0px;
    bottombottom:10px;
    height:30px;
    padding:0px 20px;
    line-height:30px;
    color:#FFF;
}
.footer a {
    text-decoration:blink;
    color:#FFF;
    border-bottom: 1px dotted #fff;
}
/* loading*/
.loading {
    position:absolute;
    top:0px;
    left:0px;
    width:100%;
    height:100%;
    z-index:99;
    overflow:hidden;
    background:#000;
}
.loading img {
    position:absolute;
    top:50%;
    left:50%;
    margin:-5px 0px 0px -29px;
}
/* 多说图标 */
.ds-login {
    margin: 0;
    padding: 0 0 0 26px;
}
@media screen and (max-width: 520px) {
#login {
    font:12px;
    padding:20px 20px;
    margin:20px auto 0;
    background-color:rgba(0,0,0,.5);
}
.ds-login {
    margin: 0 0 10px;
    padding: 0 0 0 26px;
}
}
2.2创建js文件,在主题目录下的js文件夹里创建resizeBg.js文件,代码如下:
// 后台背景修改
function resizeImage(id) {
    jQuery('#' + id).css({
            'position': 'absolute',
            'top': '0px',
            'left': '0px',
            'width': '100%',
            'height': '100%',
            'z-index': -1,
            'overflow': 'hidden'
    });
    var w = jQuery(window).width(),
    h = jQuery(window).height(),
    o = jQuery('#' + id).children('img'),
    iW = o.width(),
    iH = o.height();
    o.css({
            'display': 'block',
            'opacity': 0
    });
    if (w > h) {
            if (iW > iH) {
                    o.css({
                            'width': w
                    });
                    o.css({
                            'height': Math.round((iH / iW) * w)
                    });
                    var newIh = Math.round((iH / iW) * w);
                    if (newIh < h) {
                            o.css({
                                    'height': h
                            });
                            o.css({
                                    'width': Math.round((iW / iH) * h)
                            })
                    }
            } else {
                    o.css({
                            'height': h
                    });
                    o.css({
                            'width': Math.round((iW / iH) * h)
                    })
            }
    } else {
            o.css({
                    'height': h
            });
            o.css({
                    'width': Math.round((iW / iH) * h)
            })
    }
    var newIW = o.width(),
    newIH = o.height();
    if (newIW > w) {
            var l = (newIW - w) / 2;
            o.css('margin-left', -l)
    } else {
            o.css('margin-left', 0)
    }
    if (newIH > h) {
            var t = (newIH - h) / 2;
            o.css('margin-top', -t)
    } else {
            o.css('margin-top', 0)
    }
    o.css({
            'opacity': '1'
    })
}
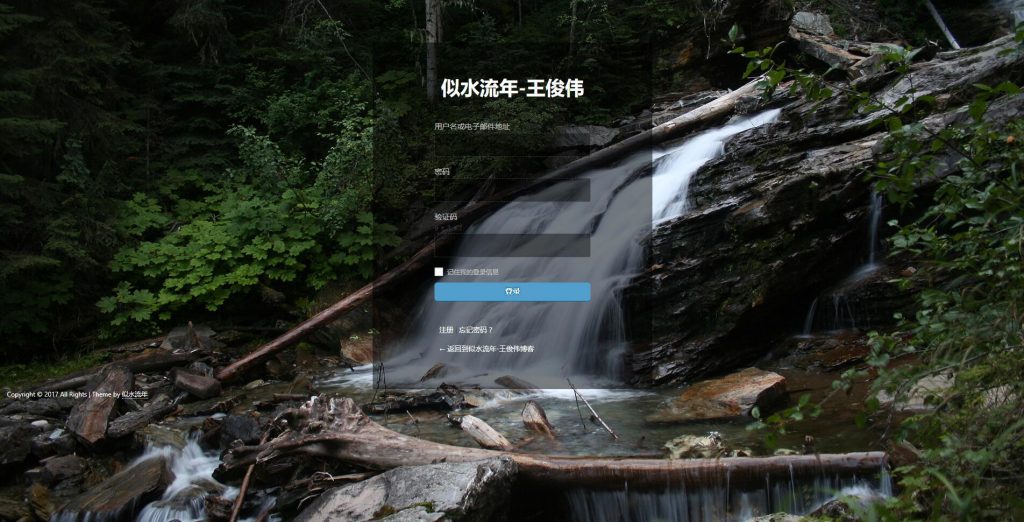
3.定义后台背景图片。
需要准备2张图片,一个是加载时候的gif图,别一个是背景大图,名称如下:
可以直接点击下载我准备好的。当然想要逼格高,自己准备哦!
将以上文件放在主题目录下的images文件夹里,没有就创建一个。
好了,大概就是这样的了!
Q&A
1.第一个文件里面有一个是调用了百度的jquery库的文件,为了方便https访问,已https化。如果想要在本地加载,如下修改方式:
将链接中的jquery.min.js文件下载到本地
然后将新添加的functions.php中第一段如下修改:
//后台登录页面
    function custom_login() {
        echo '<link rel="stylesheet" type="text/css" href="' . get_bloginfo('template_directory') . '/css/login.css" />'."\n";
        echo '<script type="text/javascript" src="'.get_bloginfo('template_directory').'/js/jquery.min.js"></script>'."\n";
    }
    add_action('login_head', 'custom_login');
//后台登录页面标题
好了,这样就修改完成了……
刷新,看效果
最后放上懒人包,但是functions.php还是要自己修改的哦,千万不可直接覆盖,会导致主题报废。
链接:http://pan.baidu.com/s/1c2tlg2G 密码:2ngl
包中的functions.php文件为了防止弄错,我做成了文本文件,直接复制内容放进function.php中。
微信扫描下方的二维码阅读本文


很好
这个很不错啊!
以搬运
不错 不错